The students began this project by tracing a letter with pencil. Then, they gave their paper a border by lining a ruler up at the edge of each side of the paper, and tracing the other side. This makes a perfectly even border with no measuring! At the end of the project, the students were supposed to erase all of their pencil lines, and they were not supposed to trace the letter or border with a pen. Of these student examples below, the last on (letter T) is the most successful because that student followed those directions perfectly. The first one (letter R) is quite aesthetically appealing to me anyway, because the student used his letter outlines to create a 3-dimensional effect. A few other pictures (J and B; 3rd and 4th from the top) are simply unfinished; the student never erased the pencil marks. I guess I should be a little more firm with following directions! Although, in the upper elementary grades, I like to give the students space, rather than breathing down their necks the whole time. If they can follow all of the directions without constant reminders, they will receive a high grade, and do very well!
Monday, May 27, 2013
5th Grade Zentangles
One of the last projects my 5th grade students completed this year was zentangles. With a creative, positive group of students, this can be really fun! Unfortunately, the kind of students who see art as just another assignment have trouble enjoying doodling.
Saturday, May 25, 2013
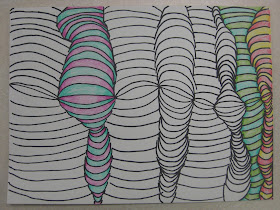
3D Line Design with 5th Grade
Last year, I introduced Op Art to my 3rd grade students, and taught them Mr. E's 3D line design. I had a very talented group that year (they are my current 4th graders, and still achieving beyond grade level in art for the most part), and their line designs turned out very well.
This year, I tried the project with an older group: my 5th grade students! They get a little restless toward the end of the school year, so a project that begins with following a few simple steps keeps them a little more focused. Also, I didn't know if we'd have time to finish one more art project before the end of the school year, so I chose this assignment because they can finish at home on their own if they want to. If I'm going to send home an unfinished art project with my students, I'd like them to at least have the option to do it on their own! Also, I think these designs still look cool when they're only half-way colored.
An added tool I had to teach the lesson this year is my Promethean board! It was so easy to teach each step by drawing on the big board with my Promethean pen. All the students could see clearly, and I could demonstrate "mistakes" and erase them effortlessly so the students would know what not to do before even picking up a Sharpie!
Friday, May 24, 2013
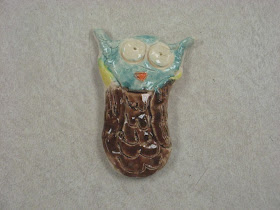
2nd Grade Clay Owls
Last year, my 2nd grade students made clay turtles using pinch pots for the shell. A lot of the students struggled with attaching all of the legs! I had only a few students who really did a great job. I decided to try the turtles again this year, since the students had more experience in working in clay, after having made pinch pots last year in 1st grade. Unfortunately, they still struggled a lot! So, we ended up squishing the clay back into my big bag and starting something new the next week. I decided to try making owls with them, and we had lots of success! Here are some images of their work, as well as all of the steps to making an owl.
Roll it into a ball:
Roll it into an oval (like making a coil):
Smash it into a flat oval:
Fold the top down to make the head:
Pinch the corners of the head to make ears:
Pinch the edges of the body to make it wider:
Fold the wings in:
Use a marker to make the eyes:
Use a toothpick to make the beak and pupils (I don't let my students use needle tools until 3rd or 4th grade):
Use the toothpick to make feathers on his stomach:
Here are the steps to making the owl. Photos are taken by one of my most talented 4th grade students, who stayed after school to help me!
Start with a small lump of clay:
Roll it into a ball:
Roll it into an oval (like making a coil):
Smash it into a flat oval:
Fold the top down to make the head:
Pinch the corners of the head to make ears:
Pinch the edges of the body to make it wider:
Fold the wings in:
Use a marker to make the eyes:
Use a toothpick to make the beak and pupils (I don't let my students use needle tools until 3rd or 4th grade):
Use the toothpick to make feathers on his stomach:


